GlideinWMS VO Frontend Installation
This document describes how to install the Glidein Workflow Managment System (GlideinWMS) VO Frontend for use with the OSG Glidein factory. This software is the minimum requirement for a VO to use GlideinWMS.
This document assumes expertise with HTCondor and familiarity with the GlideinWMS
software. It does not cover anything but the simplest possible install.
Please consult the GlideinWMS reference
documentation
for advanced topics, including non-root, non-RPM-based installation.
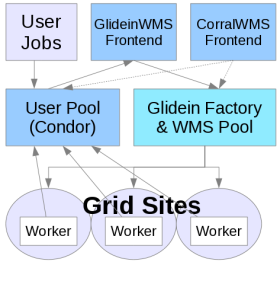
This document covers three components of the GlideinWMS a VO needs to install:
- User Pool Collectors: A set of
condor_collectorprocesses. Pilots submitted by the factory will join to one of these collectors to form a HTCondor pool. - User Pool Schedd: A
condor_schedd. Users may submit HTCondor vanilla universe jobs to this schedd; it will run jobs in the HTCondor pool formed by the User Pool Collectors. - Glidein Frontend: The frontend will periodically query the User Pool Schedd to determine the desired number of running job slots. If necessary, it will request the Factory to launch additional pilots.
This guide covers installation of all three components on the same host: it is designed for small to medium VOs (see the Hardware Requirements below). Given a significant, large host, we have been able to scale the single-host install to 20,000 running jobs.
Before Starting
Before starting the installation process, consider the following points (consulting the Reference section below as needed):
- User IDs: If they do not exist already, the installation will create the Linux users
apache(UID 48),condor,frontend, andgratia - Network: The VO frontend must have reliable network connectivity and be on the public internet (i.e. no NAT).
The latest version requires the following TCP ports to be open:
- 80 (HTTP) for monitoring and serving configuration to workers
- 9618 (HTCondor shared port) for HTCondor daemons including the Schedd and User Collector
- 9620 to 9660 for secondary collectors (depending on configuration, see below)
- Host choice: The GlideinWMS VO Frontend has the following hardware requirements for a production host:
- CPU: Four cores, preferably no more than 2 years old.
- RAM: 3GB plus 2MB per running job. For example, to sustain 2000 running jobs, a host with 5GB is needed.
- Disk: 30GB will be sufficient for all the binaries, config and log files related to GlideinWMS. As this will be an interactive access point, have enough disk space for your users' jobs.
Note
The default configuration uses a port range (9620 to 9660) for the secondary collectors. You can configure the secondary collectors to use the shared port 9618 instead; this will become the default in the future.
Note
GlideinWMS versions prior to 3.4.1 also required port 9615 for the Schedd, and did not support using shared port for the secondary collectors. If you are upgrading a standalone access point from version 3.4 or earlier, the default open port has changed from 9615 to 9618, and you need to update your firewall rules to reflect this change. You can figure out which port will be used by running the following command:
condor_config_val SHARED_PORT_ARGS
For more detailed information, see Configuring GlideinWMS Frontend.
As with all OSG software installations, there are some one-time (per host) steps to prepare in advance:
- Ensure the host has a supported operating system
- Obtain root access to the host
- Prepare the required Yum repositories
- Install CA certificates
Credentials and Proxies
The VO Frontend will use two credentials in its interactions with the other GlideinWMS services. At this time, these will be proxy files.
- the VO Frontend proxy (used to authenticate with the other GlideinWMS services).
- one or more GlideinWMS pilot proxies (used/delegated to the Factory services and submitted on the GlideinWMS pilot jobs).
The VO Frontend proxy and the pilot proxy can
be the same. By default, the VO Frontend will run as user frontend (UID is
machine dependent) so these proxies must be owned by the user frontend.
Note
Both proxies need to be passwordless to allow automatic proxy renewal.
VO Frontend proxy
The use of a service certificate is recommended. Then you create a proxy from the certificate as explained in the proxy configuration section.
You must give the Factory operations team the DN of this proxy when you initially setup the Frontend and each time the DN changes.
Pilot proxies
These proxies are used by the Factory to submit the GlideinWMS pilot jobs.
Therefore, they must be authorized to access to the CEs (Factory entry points)
where jobs are submitted. There is no need to notify the Factory operation about
the DN of these proxies (neither at the initial registration nor for subsequent
changes). These additional proxies have no special requirements or controls added by the
Factory but will probably require VO attributes because of the CEs: if you are
able to use one of these proxies to submit jobs to the corresponding CEs where the Factory runs
GlideinWMS pilots for you, then the proxies are OK. You can test each of your proxies using
globusrun or HTCondor-G.
To check the important information about a PEM certificate you can use: openssl
x509 -in /etc/grid-security/hostcert.pem -subject -issuer -dates -noout. You
will need that to find out information for the configuration files and the
request to the GlideinWMS Factory.
OSG Factory access
Before installing the GlideinWMS VO Frontend you need the information about a Glidein Factory that you can access:
- (recommended) OSG is managing a factory at UCSD
- You have another Glidein Factory that you can access
To request access to the OSG Glidein Factory at UCSD you have to send an email to osg-gfactory-support@physics.ucsd.edu providing:
- Your Name
- The VO that is utilizing the VO Frontend
- The DN of the proxy you will use to communicate with the Factory (VO Frontend DN, e.g. the host certificate subject if you follow the proxy configuration section)
- You can propose a security name that will have to be confirmed/changed by the Factory managers (see below)
-
A list of sites where you want to run:
-
Your VO must be supported on those sites
- You can provide a list or piggy back on existing lists, e.g. all the sites supported for the VO. Check with the Factory managers
- You can start with one single site
In the reply from the OSG Factory managers you will receive some information needed for the configuration of your VO Frontend
- The exact spelling and capitalization of your VO name. Sometime is different from what is commonly used, e.g. OSG VO is "OSGVO".
- The host of the Factory Collector:
gfactory-1.t2.ucsd.edu - The DN os the factory, e.g.
/DC=org/DC=doegrids/OU=Services/CN=gfactory-1.t2.ucsd.edu - The factory identity, e.g.:
[email protected] - The identity on the Factory you will be mapped to. Something like:
[email protected] - Your security name. A unique name, usually containing your VO name:
My_SecName - A string to add in the main Factory query_expr in the Frontend configuration, e.g.
stringListMember("<VO>",GLIDEIN_Supported_VOs). This is used to select the entries you can use. From there you get the correct name of the VO (above in this list).
Installing GlideinWMS Frontend
Installing HTCondor
If you don't have HTCondor already installed, you can install the HTCondor RPM from the OSG repository:
root@host # yum install condor.x86_64
If you already have installed HTCondor using a tarball or a source other than the OSG ROM, you will need to install the empty-condor RPM:
root@host # yum install empty-condor --enablerepo=osg-empty
Installing the VO Frontend RPM
Install the RPM and dependencies (be prepared for a lot of dependencies).
root@host # yum install glideinwms-vofrontend
This will install the current production release verified and tested by OSG with default HTCondor configuration. This command will install the GlideinWMS vofrontend, HTCondor, the OSG client, and all the required dependencies all on one node.
If you wish to install a different version of GlideinWMS, add the "--enablerepo" argument to the command as follows:
yum install --enablerepo=osg-testing glideinwms-vofrontend: The most recent production release, still in testing phase. This will usually match the current tarball version on the GlideinWMS home page. (The osg-release production version may lag behind the tarball release by a few weeks as it is verified and packaged by OSG). Note that this will also take the osg-testing versions of all dependencies as well.yum install --enablerepo=osg-upcoming glideinwms-vofrontend: The most recent development series release, i.e. version 3.3 release. This has newer features such as cloud submission support, but is less tested.
Note that these commands will install default HTCondor configurations with all GlideinWMS services on one node.
Installing GlideinWMS Frontend on Multiple Nodes (Advanced)
For advanced users expecting heavy usage on their access point, you may want to consider splitting the user collector, user submit, and vo frontend services. This can be doing using the following three commands (on different machines):
root@host # yum install glideinwms-vofrontend-standalone
root@host # yum install glideinwms-usercollector
root@host # yum install glideinwms-userschedd
In addition, you will need to perform the following steps:
- On the vofrontend and userschedd, modify
CONDOR_HOSTto point to your usercollector. This is in/etc/condor/config.d/00_gwms_general.config. You can also override this value by placing it in a new config file. (For instance,/etc/condor/config.d/99_local_custom.configto avoid rpmsave/rpmnew conflicts on upgrades). - In
/etc/condor/certs/condor_mapfile, you will need to add the DNs of each machine (userschedd, usercollector, vofrontend). Take great care to escape all special characters. Alternatively, you can use theglidecondor_addDNto add these values. - In the
/etc/gwms-frontend/frontend.xmlfile, change the schedd locations to match the correct server. Also change the collectors tags at the bottom of the file. More details on frontend.xml are in the following sections.
Configuring GlideinWMS Frontend
After installing the RPM, you need to configure the components of the GlideinWMS VO Frontend:
- Edit Frontend configuration options
- Edit HTCondor configuration options
- Create a HTCondor grid map file
- Reconfigure and Start the Frontend
Configuring the Frontend
The VO Frontend configuration file is /etc/gwms-frontend/frontend.xml. The next steps will describe each line that you will need to edit if you are using the OSG Factory at UCSD. The portions to edit are highlighted. If you are using a different Factory more changes are necessary, please check the VO Frontend configuration reference.
-
The VO you are affiliated with. This will identify those CEs that the GlideinWMS pilot will be authorized to run on using the pilot proxy described previously in this section. Sometimes the whole
query_expris provided to you by the Factory operators (see Factory access above):<factory query_expr='((stringListMember("VO", GLIDEIN_Supported_VOs)))'> -
Factory collector information. The
usernamethat you are assigned by the Factory (also called the identity you will be mapped to on the factory, see above) . Note that if you are using a factory different than the production Factory, you will have to change alsoDN,factory_identityandnodeattributes. (refer to the information provided to you by the Factory operator):<collector DN="/DC=org/DC=doegrids/OU=Services/CN=gfactory-1.t2.ucsd.edu" comment="Define factory collector globally for simplicity" factory_identity="[email protected]" my_identity="[email protected]" node="gfactory-1.t2.ucsd.edu"/> -
Frontend security information.
- The
classad_proxyin the security entry is the location of the VO Frontend proxy described previously here. - The
proxy_DNis the DN of theclassad_proxyabove. - The
security_nameidentifies this VO Frontend to the the Factory, It is provided by the Factory operator. - The
absfnamein the credential entry is the location of the GlideinWMS pilot proxy described in the requirements section here. There can be multiple pilot proxies, or even other kind of keys (e.g. if you use cloud resources). The type and trust_domain of the credential must match respectively auth_method and trust_domain used in the entry definition in the Factory. If there is no match, between these two attributes in one of the credentials and the corresponding ones in some entry in one of the Factories, then this Frontend cannot trigger glideins. Both theclassad_proxyandabsfnamefiles should be owned byfrontenduser.<security classad_proxy="/tmp/vo_proxy" proxy_DN="DN of vo_proxy" proxy_selection_plugin="ProxyAll" security_name="The security name, this is used by factory" sym_key="aes_256_cbc"> <credentials> <credential absfname="/tmp/pilot_proxy" security_class="frontend" trust_domain="OSG" type="grid_proxy"/> </credentials> </security>
- The
-
The schedd information.
- The
DNof the VO Frontend Proxy described previously here. - The
fullnameattribute is the fully qualified domain name of the host where you installed the VO Frontend (hostname --fqdn). A secondary schedd is optional. You will need to delete the secondary schedd line if you are not using it. Multiple schedds allow the Frontend to service requests from multiple access points.<schedds> <schedd DN="Cert DN used by the schedd at fullname:" fullname="Hostname of the schedd"/> <schedd DN="Cert DN used by the second Schedd at fullname:" fullname="schedd name@Hostname of second schedd"/> </schedds>
- The
-
The User Collector information.
- The
DNof the VO Frontend Proxy described previously here. - The
nodeattribute is the full hostname of the collectors (hostname --fqdn) and port - The
secondaryattribute indicates whether the element is for the primary or secondary collectors (True/False). The default HTCondor configuration of the VO Frontend starts multiple Collector processes on the host (/etc/condor/config.d/11_gwms_secondary_collectors.config). TheDNandhostnameon the first line are the hostname and the host certificate of the VO Frontend. TheDNandhostnameon the second line are the same as the ones in the first one. The hostname (e.g. hostname.domain.tld) is filled automatically during the installation. The secondary collector connection can be defined as sinful string for the sock case , e.g., hostname.domain.tld:9618?sock=collector16.
- The
[Example 1]
        :::xml
        <collector DN="DN of main collector"
               node="hostname.domain.tld:9618" secondary="False"/>
        <collector DN="DN of secondary collectors (usually same as DN in line above)"
               node="hostname.domain.tld:9620-9660" secondary="True"/>
Note
In GlideinWMS v3.4.1, shared port only configuration is incompatible if talking to older Factories (v3.4 or older). We strongly recommend any user of GlideinWMS Frontend v3.4.1 or newer, to transition to the use of shared port for secondary collectors and CCBs.
The shared port configuration is incompatible if your Frontend is talking to Factories v3.4 or older and you'll get an error telling you to wait.
To transition to the use of shared port for secondary collectors, you have to change the collectors section in the Frontend configuration. If you are using the default port range for the secondary collectors as shown in [Example 2] below, then you should replace it with port 9618 and the sock-range as shown in [Example 1] above.
If you have a more complex configuration, please read the detailed GlideinWMS configuration
[Example 2]
        :::xml
        <collector DN="DN of main collector"
               node="hostname.domain.tld:9618" secondary="False"/>
        <collector DN="DN of secondary collectors (usually same as DN in line above)"
               node=“hostname.domain.tld:9618?sock=collector0-40" secondary="True"/>
- The CCBs information.
If you have a different configuration of the HTCondor Connection Brokering (CCB servers) from the default (usually the section is empty as the User Collectors acts as CCB if needed), you can set the connection in the CCB section the same way that User Collector information previously mentioned. Also, the same rules for transition to shared_port of the connections, apply to the CCBs.
    :::xml
    <ccb DN="DN of the CCB server"
           node="hostname.domain.tld:9618"/>
    <ccb DN="DN of the CCB server"
           node=“hostname.domain.tld:9618?sock=collector0-40" secondary="True"/>
Warning
The Frontend configuration includes many knobs, some of which are conflicting with a RPM installation where there is only one version of the Frontend installed and it uses well known paths. Do not change the following in the Frontend configuration (you must leave the default values coming with the RPM installation):
- frontend_versioning='False' (in the first line of XML, versioning is useful to install multiple tarball versions)
- for RPM installs, work base_dir must be /var/lib/gwms-frontend/vofrontend/ (other scripts like /etc/init.d/gwms-frontend count on that value)
Using a Different Factory
The configuration above points to the OSG production Factory. If you are using a different Factory, then you have to:
- replace
[email protected]andgfactory-1.t2.ucsd.eduwith the correct values for your Factory. And control also that the name used for the Frontend () matches. - make sure that the Factory is advertising the attributes used in the Factory query expression (
query_expr).
Configuring HTCondor
The HTCondor configuration for the Frontend is placed in /etc/condor/config.d.
- 00_gwms_general.config
- 01_gwms_collectors.config
- 02_gwms_schedds.config
- 03_gwms_local.config
- 11_gwms_secondary_collectors.config
- 90_gwms_dns.config
For most installations create a new file named /etc/condor/config.d/92_local_condor.config
Using other HTCondor RPMs, e.g. UW Madison HTCondor RPM
The above procedure will work if you are using the OSG HTCondor RPMS. You can
verify that you used the OSG HTCondor RPM by using yum list condor. The
version name should include "osg", e.g. 8.6.4-3.osg.el7.
If you are using the UW Madison HTCondor RPMS, be aware of the following changes:
- This HTCondor RPM uses a file
/etc/condor/condor_config.localto add your local machine slot to the user pool. - If you want to disable this behavior (recommended), you should blank out that file or comment out the line in
/etc/condor/condor_configfor LOCAL_CONFIG_FILE. (Make sure that LOCAL_CONFIG_DIR is set to/etc/condor/config.d) - Note that the variable LOCAL_DIR is set differently in UW Madison and OSG RPMs. This should not cause any more problems in the GlideinWMS RPMs, but please take note if you use this variable in your job submissions or other customizations.
In general if you are using a non OSG RPM or if you added custom configuration files for HTCondor please check the order of the configuration files:
root@host # condor_config_val -config
Configuration source:
    /etc/condor/condor_config
Local configuration sources:
    /etc/condor/config.d/00_gwms_general.config
    /etc/condor/config.d/01_gwms_collectors.config
    /etc/condor/config.d/02_gwms_schedds.config
    /etc/condor/config.d/03_gwms_local.config
    /etc/condor/config.d/11_gwms_secondary_collectors.config
    /etc/condor/config.d/90_gwms_dns.config
    /etc/condor/condor_config.local
If, like in the example above, the GlideinWMS configuration files are not the last ones in the list please verify that important configuration options have not been overridden by the other configuration files.
Verifying your HTCondor configuration
-
The GlideinWMS configuration files in
/etc/condor/config.dshould be the last ones in the list. If not, please verify that important configuration options have not been overridden by the other configuration files. -
Verify the alll the expected HTCondor daemons are running:
root@host # condor_config_val -verbose DAEMON_LIST DAEMON_LIST: MASTER, COLLECTOR, NEGOTIATOR, SCHEDD, SHARED_PORT, COLLECTOR0
COLLECTOR1 COLLECTOR2 COLLECTOR3 COLLECTOR4 COLLECTOR5 COLLECTOR6 COLLECTOR7 COLLECTOR8 COLLECTOR9 COLLECTOR10 , COLLECTOR11, COLLECTOR12,
COLLECTOR13, COLLECTOR14, COLLECTOR15, COLLECTOR16, COLLECTOR17, COLLECTOR18, COLLECTOR19, COLLECTOR20, COLLECTOR21, COLLECTOR22, COLLECTOR23,
COLLECTOR24, COLLECTOR25, COLLECTOR26, COLLECTOR27, COLLECTOR28, COLLECTOR29, COLLECTOR30, COLLECTOR31, COLLECTOR32, COLLECTOR33, COLLECTOR34,
COLLECTOR35, COLLECTOR36, COLLECTOR37, COLLECTOR38, COLLECTOR39, COLLECTOR40
Defined in '/etc/condor/config.d/11_gwms_secondary_collectors.config', line 193.
If you don't see all the collectors. shared port and the two schedd, then the
configuration must be corrected. There should be no startd daemons
listed.
Creating a HTCondor grid mapfile.
The HTCondor mapfile (/etc/condor/certs/condor_mapfile) is used for
authentication between the GlideinWMS pilot running on a remote worker node, and
the local collector. HTCondor uses the mapfile to map certificates to pseudo-users
on the local machine. It is important that you map the DN's of:
-
Each schedd proxy: The
DNof each schedd that the frontend talks to. Specified in the frontend.xml schedd elementDNattribute:<schedds> <schedd DN="/DC=org/DC=doegrids/OU=Services/CN=YOUR_HOST" fullname="YOUR_HOST"/> <schedd DN="/DC=org/DC=doegrids/OU=Services/CN=YOUR_HOST" fullname="schedd_jobs2@YOUR_HOST"/> </schedds> -
Frontend proxy: The DN of the proxy that the Frontend uses to communicate with the other GlideinWMS services. Specified in the frontend.xml security element
proxy_DNattribute:<security classad_proxy="/tmp/vo_proxy" proxy_DN="DN of vo_proxy" .... -
Each pilot proxy The DN of each proxy that the frontend forwards to the factory to use with the GlideinWMS pilots. This allows the GlideinWMS pilot jobs to communicate with the User Collector. Specified in the frontend.xml proxy
absfnameattribute (you need to specify theDNof each of those proxies:<security .... <proxies> < proxy absfname="/tmp/vo_proxy" .... : </proxies>
Below is an example mapfile, by default found in
/etc/condor/certs/condor_mapfile. In this example there are lines for each of
services mentioned above.
GSI "<DN OF SCHEDD PROXY>" schedd
GSI "<DN OF FRONTEND PROXY>" frontend
GSI "<DN OF PILOT PROXY>" pilot_proxy
GSI "^/DC=org/DC=doegrids/OU=Services/CN=personal-submit-host2.mydomain.edu$" <example_of_format>
GSI (.*) anonymous
FS (.*) \1
Change <DN OF SCHEDD PROXY>, <DN OF FRONTEND PROXY>, and <DN OF PILOT PROXY> to the distinguished names of the
respective proxies.
Restarting HTCondor
After configuring HTCondor, be sure to restart HTCondor:
root@host # service condor restart
Proxy Configuration
GlideinWMS comes with the gwms-renew-proxies service that can automatically generate
and renew the pilot proxies and VO Frontend proxy. To configure this service, modify
/etc/gwms-frontend/proxies.ini using the following instructions:
-
For each of your pilot proxies, create a
[PILOT <NAME>]section, where<NAME>is a descriptive name for the proxy that is unique to your local configuration. In each section, set theproxy_cert,proxy_key,output, andvocorresponding to each pilot proxy:[PILOT <NAME>] proxy_cert = <PATH TO THE PILOT CERTIFICATE> proxy_key = <PATH TO THE PILOT KEY> output = <PATH TO CREATE THE PILOT PROXY> vo = <NAME OF VIRTUAL ORGANIZATION>Change
<PATH TO THE PILOT CERTIFICATE>,<PATH TO THE PILOT KEY>and<PATH TO CREATE THE PILOT PROXY>appropriately to point to the locations of the pilot certificate, pilot key, and pilot proxy, respectively.Additionally, in each
[PILOT <NAME>]section, you must specify how the proxy's VOMS attributes will be signed by settinguse_voms_server. Choose one of the following options:-
To directly sign the VOMS attributes (recommended), you must have access to the
vo's certificate and key. Specify the paths to thevocertificate and key, and optionally, the VOMS attribute (e.g./osg/Role=NULL/Capability=NULLfor the OSG VO):use_voms_server = false vo_cert = <PATH TO THE PILOT CERTIFICATE> vo_key = <PATH TO THE PILOT KEY> fqan = <VOMS ATTRIBUTE>Note
If you do not have access to the
vo'svoms_certandvoms_key, contact the VO manager. -
To have your proxy's VOMS attributes signed by the
vo's VOMS server, setuse_voms_server = trueand the VOMS attribute (e.g./osg/Role=NULL/Capability=NULLfor the OSG VO):use_voms_server = true fqan = <VOMS ATTRIBUTE>Warning
Due to the retirement of VOMS Admin server in the OSG,
use_voms_server = falseis the preferred method for signing VOMS attributes.
Optionally, the proxy renewal
frequencyandlifetime(in hours) can be specified in each[PILOT <NAME>]section:# Default: 1 frequency = <RENEWAL FREQUENCY> # Default: 24 lifetime = <PROXY LIFETIME> -
-
Configure the location and output of the VO Frontend proxy under the
[FRONTEND]section and set theproxy_cert,proxy_key, andoutputto paths corresponding to your VO Frontend:[FRONTEND] proxy_cert = <PATH TO THE FRONTEND CERTIFICATE> proxy_key = <PATH TO THE FRONTEND KEY> output = <PATH TO CREATE THE FRONTEND PROXY>Note
outputmust be the same path as theclassad_proxyspecified in this section -
(OPTIONAL) If you are running the
gwms-frontendservice under a<NON-DEFAULT USER>(default:frontend), specify the user as the owner of your proxies under the[COMMON]section:[COMMON] owner = <NON-DEFAULT USER>Note
The
[COMMON]section is required but its contents are optional
Adding Gratia Accounting and a Local Monitoring Page on a Production Server
You must report accounting information if you are running more than a few test jobs on the OSG .
-
Install the GlideinWMS Gratia Probe on each of your access points in your GlideinWMS installation:
root@host # yum install gratia-probe-glideinwms -
Edit the ProbeConfig located in
/etc/gratia/condor/ProbeConfig. First, edit theSiteNameandProbeNameto be a unique identifier for your GlideinWMS access point. There can be multiple probes (with different names) per site. If you haven't already, you should register your GlideinWMS access point in OIM. Then you can use the name you used to register the resource.ProbeName="condor:<hostname>" SiteName="HCC-GlideinWMW-Frontend"Next, turn the probe on by setting
EnableProbe:EnableProbe="1" -
Reconfigure HTCondor:
root@host # condor_reconfig
Optional Accounting Configuration
The following sections contain additional configuration that may be required depending on the customizations you've made to your GlideinWMS frontend installation.
Users without Certificates
If you have users that submit jobs without a certificate explicitly declared in the submit file, you will need to add MapUnknownToGroup to the ProbeConfig. In the file /etc/gratia/condor/ProbeConfig, add the value after the EnableProbe.
    ...
    SuppressGridLocalRecords="0"
    EnableProbe="1"
    MapUnknownToGroup="1"

    Title3="Tuning parameter"
    ...
Further, if you want to record all usage as coming from a single VO, you can configure the probe to override the 'guessed' VO. In the below example, replace <ENGAGE> with a registered VO that you would like to report as. If you don't have a VO that you are affiliated with, you may use "Engage".
...
    MapUnknownToGroup="1"
    MapGroupToRole="1"
    VOOverride="<ENGAGE>"
...
Non-Standard HTCondor Install
If HTCondor is installed in a non-standard location (i.e., not RPMs, or relocated RPM outside /usr/bin), then you need to tell the probe where to find the HTCondor binaries. This can be done with a script with a special attribute in /etc/gratia/condor/ProbeConfig, CondorLocation. Point it to the location of the HTCondor install, such that CondorLocation/bin/condor_version exists.
New Data Directory
If your PER_JOB_HISTORY_DIR HTCondor configuration variable is different from the default value, you must update the value of DataFolder in /etc/gratia/condor/ProbeConfig. To check the value of PER_JOB_HISTORY_DIR run the following command:
user@host $ condor_config_val PER_JOB_HISTORY_DIR
Different collector and other customizations
By default the probe reports to the OSG GRACC. To change that you must edit the configuration file, /etc/gratia/condor/ProbeConfig, and replace the OSG production host with your desired one:
...
    CollectorHost="gratia-osg-prod.opensciencegrid.org:80"
    SSLHost="gratia-osg-prod.opensciencegrid.org:443"
    SSLRegistrationHost="gratia-osg-prod.opensciencegrid.org:80"
...
Optional Configuration
The following configuration steps are optional and will likely not be required for setting up a small site. If you do not need any of the following special configurations, skip to the section on using GlideinWMS.
Allowing users to specify where their jobs run
In order to allow users to specify the sites at which their jobs want to run (or
to test a specific site), a Frontend can be configured to match on
DESIRED_Sites or ignore it if not specified. Modify
/etc/gwms-frontend/frontend.xml using the following instructions:
-
In the Frontend's global
<match>stanza, set thematch_expr:'((job.get("DESIRED_Sites","nosite")=="nosite") or (glidein["attrs"]["GLIDEIN_Site"] in job.get("DESIRED_Sites","nosite").split(",")))' -
In the same
<match>stanza, set thestart_expr:'(DESIRED_Sites=?=undefined || stringListMember(GLIDEIN_Site,DESIRED_Sites,",")) -
Add the
DESIRED_Sitesattribute to the match attributes list:<match_attrs> <match_attr name="DESIRED_Sites" type="string"/> </match_attrs> -
Reconfigure the Frontend:
root@host # /etc/init.d/gwms-frontend reconfig
Creating a group for testing configuration changes
To perform configuration changes without impacting production the recommended
way is to create an ITB group in /etc/gwms-frontend/frontend.xml. This
groupwould only match jobs that have the +is_itb=True ClassAd.
-
Create a group named itb.
-
Set the group's
start_exprso that the group's glideins will only match user jobs with+is_itb=True:<match match_expr="True" start_expr="(is_itb)"> -
Set the
factory_query_exprso that this group only communicates with ITB factories:<factory query_expr='FactoryType=?="itb"'> -
Set the group's
collectorstanza to reference the ITB factory, replacing[email protected]with your factory identity:<collector DN="/DC=com/DC=DigiCert-Grid/O=Open Science Grid/OU=Services/CN=glidein-itb.grid.iu.edu" \ factory_identity="[email protected]" \ my_identity="[email protected]" \ node="glidein-itb.grid.iu.edu"/> -
Set the job
query_exprso that only ITB jobs appear incondor_q:<job query_expr="(!isUndefined(is_itb) && is_itb)"> -
Reconfigure the Frontend (see the section below):
# on EL7 systems
systemctl reload gwms-frontend
Using GlideinWMS
Managing GlideinWMS Services
In addition to the GlideinWMS service itself, there are a number of supporting services in your installation. The specific services are:
| Software | Service name | Notes |
|---|---|---|
| Fetch CRL | EL8: fetch-crl.timer EL7: fetch-crl-boot and fetch-crl-cron |
See CA documentation for more info |
| Gratia | gratia-probes-cron |
Accounting software |
| HTCondor | condor |
|
| HTTPD | httpd |
GlideinWMS monitoring and staging |
| GlideinWMS | gwms-renew-proxies.timer |
Automatic proxy renewal |
gwms-frontend |
The main GlideinWMS service | |
Start the services in the order listed and stop them in reverse order. As a reminder, here are common service commands (all run as root):
| To... | Run the command... |
|---|---|
| Start a service | systemctl start <SERVICE-NAME> |
| Stop a service | systemctl stop <SERVICE-NAME> |
| Enable a service to start on boot | systemctl enable <SERVICE-NAME> |
| Disable a service from starting on boot | systemctl disable <SERVICE-NAME> |
Reconfiguring GlideinWMS
After changing the configuration of GlideinWMS, run the following command as root:
root@host # systemctl reload gwms-frontend
Note
Note that systemctl reload gwms-frontend will work only if:
- gwms-frontend service is running
- gwms-frontend service was started with systemctl
Otherwise, you will get the following error in any of the cases:
# systemctl reload gwms-frontend
Job for gwms-frontend.service invalid.
Upgrading GlideinWMS FrontEnd
After upgrading the GlideinWMS RPM, you must issue an upgrade command to GlideinWMS:
-
Stop the
condorandgwms-frontendservices as specified in this section -
Issue the upgrade command:
root@host # /usr/sbin/gwms-frontend upgrade -
Start the
condorandgwms-frontendservices as specified in this section
Validating GlideinWMS Frontend
The complete validation of the Frontend is the submission of actual jobs. However, there are a few things that can be checked prior to submitting user jobs to HTCondor.
Verifying Services Are Running
There are a few things that can be checked prior to submitting user jobs to HTCondor.
-
Verify all HTCondor daemons are started.
user@host $ condor_config_val -verbose DAEMON_LIST
DAEMON_LIST: MASTER,  COLLECTOR, NEGOTIATOR,  SCHEDD, SHARED_PORT, SCHEDDJOBS2 COLLECTOR0 COLLECTOR1 COLLECTOR2
COLLECTOR3 COLLECTOR4 COLLECTOR5 COLLECTOR6 COLLECTOR7 COLLECTOR8 COLLECTOR9 COLLECTOR10 , COLLECTOR11,
COLLECTOR12, COLLECTOR13, COLLECTOR14, COLLECTOR15, COLLECTOR16, COLLECTOR17, COLLECTOR18, COLLECTOR19, COLLECTOR20,
COLLECTOR21, COLLECTOR22, COLLECTOR23, COLLECTOR24, COLLECTOR25, COLLECTOR26, COLLECTOR27, COLLECTOR28, COLLECTOR29,
COLLECTOR30, COLLECTOR31, COLLECTOR32, COLLECTOR33, COLLECTOR34, COLLECTOR35, COLLECTOR36, COLLECTOR37, COLLECTOR38,
COLLECTOR39, COLLECTOR40
Defined in '/etc/condor/config.d/11_gwms_secondary_collectors.config', line 193.
If you don't see all the collectors and the two schedds, then the configuration must be corrected. There should be no startd daemons listed
-
Verify all VO Frontend HTCondor services are communicating.
user@host $ condor_status -any MyType TargetType Name glideresource None MM_fermicloud026@gfactory_inst Scheduler None fermicloud020.fnal.gov DaemonMaster None fermicloud020.fnal.gov Negotiator None fermicloud020.fnal.gov Collector None [email protected] Scheduler None [email protected] -
To see the details of the glidein resource use
condor_status -subsystem glideresource -l, including the GlideFactoryName. -
Verify that the Factory is seeing correctly the Frontend using
condor_status -pool <FACTORY_HOST> -any -constraint 'FrontendName=="<FRONTEND_NAME_FROM_CONFIG>"' -l, including the GlideFactoryName.
Where <FACTORY_HOST> is the hostname of the factory being used, for example: gfactory-1.t2.ucsd.edu and
GlideinWMS Job submission
HTCondor submit file glidein-job.sub. This is a simple job printing the hostname of the host where the job is running:
#file glidein-job.sub
universe = vanilla
executable = /bin/hostname
output = glidein/test.out
error = glidein/test.err
requirements = IS_GLIDEIN == True
log = glidein/test.log
ShouldTransferFiles = YES

when_to_transfer_output = ON_EXIT
queue
To submit the job:
root@host # condor_submit glidein-job.sub
Then you can control the job like a normal HTCondor job, e.g. to check the status of the job use condor_q.
Monitoring Web pages
You should be able to see the jobs also in the GlideinWMS monitoring pages that are
made available on the Web:
http://gwms-frontend-host.domain/vofrontend/monitor/
Troubleshooting GlideinWMS
File Locations
| File Description | File Location |
|---|---|
| Configuration file | /etc/gwms-frontend/frontend.xml |
| Logs | /var/log/gwms-frontend/ |
| Startup script | /usr/bin/gwms-frontend |
| Web Directory | /var/lib/gwms-frontend/web-area |
| Web Base | /var/lib/gwms-frontend/web-base |
| Web configuration | /etc/httpd/conf.d/gwms-frontend.conf |
| Working Directory | /var/lib/gwms-frontend/vofrontend/ |
| Lock files | /var/lib/gwms-frontend/vofrontend/lock/frontend.lock /var/lib/gwms-frontend/vofrontend/group_*/lock/frontend.lock |
| Status files | /var/lib/gwms-frontend/vofrontend/monitor/group_*/frontend_status.xml |
Note
/var/lib/gwms-frontend is also the home directory of the frontend user
Certificates brief
Here a short list of files to check when you change the certificates. Note that if you renew a proxy or certificate and the DN remains the same no configuration file needs to change, just put the renewed certificate/proxy in place.
| File Description | File Location |
|---|---|
| Configuration file | /etc/gwms-frontend/frontend.xml |
| HTCondor certificates map | /etc/condor/certs/condor_mapfile (1) |
| Host certificate and key (2) | /etc/grid-security/hostcert.pem /etc/grid-security/hostkey.pem |
| VO Frontend proxy (from host certificate) | /tmp/vofe_proxy (3) |
| Pilot proxy | /tmp/pilot_proxy (3) |
-
If using HTCondor RPM installation, e.g. the one coming from OSG. If you have separate/multiple HTCondor hosts (schedds, collectors, negotiators, ..) you may have to check this file on all of them to make sure that the HTCondor authentication works correctly.
-
Used to create the VO Frontend proxy if following the instructions above
-
If using the Frontend configuration and scripts described above in this document. These paths are the ones specified in the configuration file.
Remember also that when you change DN:
- The VO Frontend certificate DN must be communicated to the GlideinWMS Factory (see above)
- The pilot proxy must be able to run jobs at the sites you are using, e.g. by being added to the correct VO in OSG (the Factory forwards the proxy and does not care about the DN)
Increase the log level and change rotation policies
You can increase the log level of the frontend. To add a log file with all the log information add the following line with all the message types in the process_log section of /etc/gwms-frontend/frontend.xml:
<log_retention>
   <process_logs>
       <process_log extension="all" max_days="7.0" max_mbytes="100.0" min_days="3.0" msg_types="DEBUG,EXCEPTION,INFO,ERROR,ERR"/>
You can also change the rotation policy and choose whether compress the rotated files, all in the same section of the config files:
- max_bytes is the max size of the log files
- max_days it will be rotated.
- compression specifies if rotated files are compressed
- backup_count is the number of rotated log files kept
Further details are in the reference documentation.
Frontend reconfig failing
If service gwms-frontend reconfig fails at the end with an error like "Writing back config file failed, Reconfiguring the frontend [FAILED]", make sure that /etc/gwms-frontend/ belongs to the frontend user. It must be able to write to update the configuration file.
Frontend failing to start
If the startup script of the frontend is failing, check the log file for errors (probably /var/log/gwms-frontend/frontend/frontend.<TODAY's DATE>.err.log and .debug.log).
If you find errors like "Exception occurred: ... 'ExpatError: no element found: line 1, column 0\n']" and "IOError: [Errno 9] Bad file descriptor" you may have an empty status file (/var/lib/gwms-frontend/vofrontend/monitor/group_*/frontend_status.xml) that causes GlideinWMS Frontend not to start. The glideinFrontend crashes after a XML parsing exception visible in the log file ("Exception occurred: ... 'ExpatError: no element found: line 1, column 0\n']").
Remove the status file. Then start the frontend. The Frontend will be fixed in future versions to handle this automatically.
Certificates not there
The scripts should send an email warning if there are problems and they fail to generate the proxies. Anyway something could go wrong and you want to check manually. If you are using the scripts to generate automatically the proxies but the proxies are not there (in /tmp or wherever you expect them):
- make sure that the scripts are there and configured with the correct values
- make sure that the scripts are executable
- make sure that the scripts are in
frontend's crontab - make sure that the certificates (or master proxy) used to generate the proxies is not expired
Failed authentication
If you get a failed authentication error (e.g. "Failed to talk to factory_pool gfactory-1.t2.ucsd.edu...) then:
- check that you have the right x509 certificates mentioned in the security section of
/etc/gwms-frontend/frontend.xml- the owner must be
frontend(user running the frontend) - the permission must be 600
- they must be valid for more than one hour (2/300 hours), at least the non VO part
- the owner must be
- check that the clock is synchronized (see HostTimeSetup)
Frontend doesn't trust Factory
If your frontend complains in the debug log:
code 256:['Error: communication error\n', 'AUTHENTICATE:1003:Failed to authenticate with any method\n', 'AUTHENTICATE:1004:Failed to authenticate using GSI\n', "GSI:5006:Failed to authenticate because the subject '/DC=org/DC=doegrids/OU=Services/CN=devg-3.t2.ucsd.edu' is not currently trusted by you. If it should be, add it to GSI_DAEMON_NAME in the condor_config, or use the environment variable override (check the manual).\n", 'GSI:5004:Failed to gss_assist_gridmap /DC=org/DC=doegrids/OU=Services/CN=devg-3.t2.ucsd.edu to a local user.
A possible solution is to comment/remove the LOCAL_CONFIG_DIR in the file /var/lib/gwms-frontend/vofrontend/frontend.condor_config.
No security credentials match for factory pool ..., not advertising request
You may see a warning like "No security credentials match for factory pool ..., not advertising request", if the trust_domain and auth_method of an entry in the Factory configuration is not matching any of the trust_domain, type couples in the credentials in the Frontend configuration. This causes the Frontend not to use some Factory entries (the ones not matching) and may end up without entries to send glideins to.
To fix the problem make sure that those attributes match as desired.
Jobs not running
If your jobs remain Idle
- Check the frontend log files (see above)
- Check the HTCondor log files (
condor_config_val LOGwill give you the correct log directory):- Specifically look the CollectorXXXLog files
Common causes of problems could be:
- x509 certificates
- missing or expired or too short-lived proxy
- incorrect ownership or permission on the certificate/proxy file
- missing certificates
- If the Frontend http server is down in the glidein logs in the Factory there will be errors like "Failed to load file 'description.dbceCN.cfg' from
http://FRONTEND_HOST/vofrontend/stage."- check that the http server is running and you can reach the URL (
http://FRONTEND_HOST/vofrontend/stage/description.dbceCN.cfg)
- check that the http server is running and you can reach the URL (
Getting Help
To get assistance about the OSG software please use this page.
For specific questions about the Frontend configuration (and how to add it in your HTCondor infrastructure) you can email the glideinWMS support glideinwms-support@fnal.gov
To request access the OSG Glidein Factory (e.g. the UCSD factory) you have to send an email to osg-gfactory-support@physics.ucsd.edu (see below).
References
Definitions:
- What is a Virtual Organization
Documents about the Glidein-WMS system and the VO frontend:
Users
The Glidein WMS Frontend installation will create the following users unless they are already created.
| User | Default uid | Comment |
|---|---|---|
apache |
48 | Runs httpd to provide the monitoring page (installed via dependencies). |
condor |
none | HTCondor user (installed via dependencies). |
frontend |
none | This user runs the glideinWMS VO frontend. It also owns the credentials forwarded to the factory to use for the glideins. |
gratia |
none | Runs the Gratia probes to collect accounting data (optional see the Gratia section below) |
Warning
UID 48 is reserved by RedHat for user apache. If it is already taken by a different username, you will experience errors.
Certificates
This document has a proxy configuration section that uses the host certificate/key and a user certificate to generate the required proxies.
| Certificate | User that owns certificate | Path to certificate |
|---|---|---|
| Host certificate | root |
/etc/grid-security/hostcert.pem |
| Host key | root |
/etc/grid-security/hostkey.pem |
Here are instructions to request a host certificate.
Networking
| Service Name | Protocol | Port Number | Inbound | Outbound | Comment |
|---|---|---|---|---|---|
| HTCondor port range | tcp | LOWPORT, HIGHPORT |
YES |
contiguous range of ports | |
| GlideinWMS Frontend | tcp | 9618, 9620 to 9660 | YES |
HTCondor Collectors for the GlideinWMS Frontend (received ClassAds from resources and jobs) |
The VO frontend must have reliable network connectivity, be on the public internet (no NAT), and preferably with no firewalls. Incoming TCP ports 9618 to 9660 must be open.